This week we’ll be talking about administering blood products. Today we’ll take generally about Blood Products – on Thursday we’ll talk about reactions and provide you with some questions to answer.
Saunder’s has an excellent chapter that talks all about blood products – you’ll find it in chapter 15.
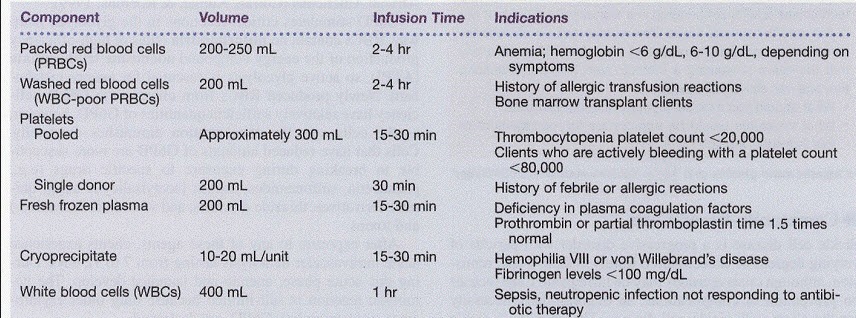
For different types of blood products – please review the graphic above.
The Procedure –
- Verify the writtenorder for the transfusion.
- Greet and identify the patient.
- Explain the procedure to the client.
- Start I.V. if necessary. Use an 18- to 20-gauge catheter. Larger-gauge catheters encourage blood flow and reduce the risk of hemolysis
- Have the client sign consent.
- Obtain baseline vital signs.
- Obtain the blood products from the blood bank you will need to begin the transfusion within 30 minutes. Inspect blood and components immediately prior to transfusion to make sure the container is intact and that the blood appears normal. If there are signs of hemolysis, a color change in the blood bag as compared with the blood in the tubing segments, a cloudy appearance, or the presence of suspended matter, do not spike the container or administer the blood. Return the blood to the blood bank for further examination.
- Verify the blood product and the client with another nurse.
- Client’s name, blood group, RH type.
- Cross-match compatibility.
- Donor blood group and RH type.
- Unit and hospital number.
- Expiration date and time on blood bag.
- Type of blood product compared with written order.
- Presence of clots in blood.
- Wash hands and put on gloves.
- Open blood administration kit and close roller clamps.
- For Y-tubing set:
- Spike the normal saline bag and prime the tubing between the saline bag and the filter.
- Squeeze sides of drip chamber and allow filter to partially fill.
- Open lower roller clamp and prime tubing to the hub.
- Close lower clamp.
- Invert blood bag once or twice. Spike blood bag, open clamps, and fill tubing completely, covering the filter with blood.
- Close lower clamp.
- For single tubing set:
- Spike blood unit using filter tubing.
- Squeeze drip chamber and allow the filter to fill with blood.
- Open roller clamp and allow tubing to fill with blood.
- Piggyback a saline line into the blood administration tubing.
- Secure all connections with tape.
- Attach tubing to venous catheter aseptically and open clamps on blood tubing.
- Infuse the blood product at the ordered rate. Blood must be infused within four hours.
- Remain with the client for the first 15-30 minutes, monitoring vital signs frequently according to institutional policy.
- After the blood, has infused, flush the tubing with normal saline.
- Dispose of bag, tubing, and gloves appropriately. Wash hands.
- Document the procedure.
Important notes:
- When you must use a pressure device for rapid infusion, make sure the IV-access catheter is an 18-gauge or larger to avoid vein damage.
- When using primary tubing with multiple piggyback Y-ports, use the port closest to the patient to reduce the risk for precipitation or hemolysis in the primary tubing. (Administer fresh frozen plasma and platelets directly into the IV catheter.)
Blood Types –
A great video about Blood Types – https://www.youtube.com/watch?v=Gn0yrQa8Cys
Want more / advanced – the article goes in depth about different types of blood products – http://www.aafp.org/afp/2011/0315/p719.html

